Arduino (上)
Android App
2019/02/20 陳惴棋
Arduino (下)
1010011000101...
2019/02/20 林弘祥
目錄
- Android
- Arduino
- 基本語法解說
- SG-90 控制代碼教學
- HC-05 基本指令教學
- 綜合應用
Android
App Inventor
按照圖片做一個App吧


Arduino
還記得電路圖吧? 先將它給連接好吧 \(OwO \)

安裝軟體
安裝 PL2303 的驅動程式
下載連結安裝 Arduino IDE
下載連結打開Arduino IDE 看看有沒有找到pro mini版吧!
(ex: COM6 : Arduino pro mini)
基本語法解說
跟C++很像 有學過的可以自己玩玩
想學C++的 歡迎來我們社團玩玩 (OHO)
那...就開始寫吧 !(OuO )
沒有拉... Copy & Paste 而已
Hello World
Arduino版
(/ OAO)/ Blink !!!
(@ File/Open Example/Basics/Blink.ino)
確認板子有設定對...
上傳看看有沒有發生什麼變化吧! (OuO)
理論上 多了一顆閃爍的LED (O_O)?
							嘗試看看更改第34,36行的數字看看
							delay(...);
閃的速度變了 !(OAO )
恭喜大家完成第一個程式 \(>w<)/
講解一下剛剛那段代碼在做啥吧 \(OwO \)
註解
功能類似備忘錄,讓人知道這是在做啥的
比如這裡就是版權宣告 \(O_O \)
/*
  Blink

  Turns an LED on for one second, then off for one second, repeatedly.

  Most Arduinos have an on-board LED you can control. On the UNO, MEGA and ZERO
  it is attached to digital pin 13, on MKR1000 on pin 6. LED_BUILTIN is set to
  the correct LED pin independent of which board is used.
  If you want to know what pin the on-board LED is connected to on your Arduino
  model, check the Technical Specs of your board at:
  https://www.arduino.cc/en/Main/Products

  modified 8 May 2014
  by Scott Fitzgerald
  modified 2 Sep 2016
  by Arturo Guadalupi
  modified 8 Sep 2016
  by Colby Newman

  This example code is in the public domain.

  http://www.arduino.cc/en/Tutorial/Blink
*/

// the setup function runs once when you press reset or power the board
註解
不會影響到程式本身,有兩種表達形式
// 單行註解
/*
  多行註解
  多行註解
  多行註解
*/
函數
告訴電腦按照(先前)定義好的指令做事
格式: [return type] [name](*args){/*codes*/};
// the setup routine runs once when you press reset:
void setup() {
  // initialize the digital pin as an output.
  pinMode(led, OUTPUT);
}
// the loop routine runs over and over again forever:
void loop() {
  digitalWrite(led, HIGH);   // turn the LED on (HIGH is the voltage level)
  delay(1000);               // wait for a second
  digitalWrite(led, LOW);    // turn the LED off by making the voltage LOW
  delay(1000);               // wait for a second
}
舉例來說:
剛剛再玩的delay();就是一種函數
delay(1000);流程控制
有點難解釋...後面用到再講
先記得電腦都是一行一行執行的就好
SG-90 控制代碼教學
SG-90 本體

本段落會用到的一些代碼
Servo MyServo;
MyServo.attach(pin, 500, 2400);
MyServo.write(pos);講解一下這次的範例在做啥吧 \(OwO \)
引入檔案並宣告一個物件MyServo
#include <Wire.h>
#include <Servo.h>
#define DataPin 8
Servo MyServo;
指定MyServo的輸出位置並歸位
MyServo.attach(DataPin, 500, 2400);
MyServo.write(90);
指定MyServo轉到...度(0~180)
MyServo.write(...);好了 可以來玩拉 \(OwO \)
嘗試看看更改第10~13行的數字看看
MyServo.write(...);
delay(...);
MyServo.write(...);
delay(...);
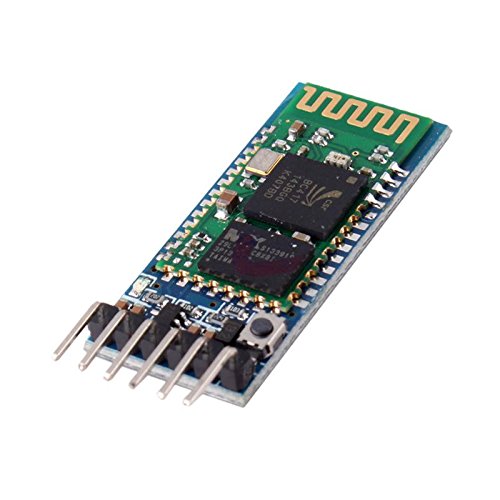
HC-05 基本指令教學
HC-05 本體

本段落會用到的一些代碼
SoftwareSerial BTSerial(RXD, TXD);
BTSerial.begin(38400);
BTSerial.available();
Serial.read();
BTSerial.write(...);講解一下這次的範例在做啥吧 \(OwO \)
引入檔案並宣告一個物件BTSerial
#include <SoftwareSerial.h>
SoftwareSerial BTSerial(10, 11);
初始化BTSerial
規範HC-05,Arduino,PC間的通訊速率
void setup() {
pinMode(9, OUTPUT);
digitalWrite(9, HIGH);
Serial.begin(9600);
BTSerial.begin(38400);
}
建立並進行HC-05,Arduino,PC間的通訊
void loop() {
  if (BTSerial.available())
    Serial.write(BTSerial.read());
  if (Serial.available())
    BTSerial.write(Serial.read());
}
確認藍芽模組已進入AT模式(信號燈閃爍)
開啟序列埠監控視窗(Ctrl+Shift+M)
輸入「AT」看看是否能收到OK的回應
視個人需求更改藍芽模組設定
| ... | Command |
|---|---|
| 查詢address | AT+ADDR? |
| 查詢名字 | AT+NAME? |
| 更改名字為XXX | AT+NAME=XXX |
| 查詢配對密碼 | AT+PSWD? |
| 更改配對密碼為XXX | AT+PSWD=XXX |
綜合應用
先上傳範例到Arduino上
上傳App到Android手機上
魔王來襲!!! (X_X)
本次課程最難的部分......
60+ 行 (OAO )
#define KEY 10
#define RXD 11
#define TXD 12
#include
#include
#include

// Servo motor
#define Servo_1_Data 5
#define Servo_2_Data 6
Servo Servo_1, Servo_2;
int pos_1 = 0, pos_2 = 0;


SoftwareSerial BT(RXD, TXD);

void setup() {
  BT.begin(38400);
  Serial.begin(9600);

  //setting motor
  pinMode(KEY, OUTPUT);
  digitalWrite(KEY, LOW);

  //testing motor
  Servo_1.attach(Servo_1_Data,500,2400);
  Servo_2.attach(Servo_2_Data,500,2400);
  Servo_1.write(90);
  Servo_2.write(90);
  delay(3000);
}

void loop() {
  int cmd[3],ptr=0;
  int table[5][3]={
      {128,128,128}, //2
      {248,128,128}, //3
      {120,248,128}, //5
      {128,248,128}, //6
      {248,248,128}  //7
    };
  while(1){
    while(BT.available()>0){;
      cmd[ptr] = BT.read();
      ptr++;
    }
    if(ptr == 3){
      for(int i=0;i<5;i++){
        int flag = 1;
        for(int j=0;j<3;  .j++){
          if(table[i][j]!=cmd[j]){
            flag = 0;
            break;
          }
        }
        if(flag > 0){
          if(i == 0){ //set to 180
            Servo_1.write(180);
            Serial.println(2);
          }
          else if(i == 1){ //set to 0
            Servo_1.write(0);
            Serial.println(3);
          }
          else if(i == 2){ //set to 180
            Servo_2.write(180);
            Serial.println(5);
          }
          else if(i == 3){ //set to 0
            Servo_2.write(0);
            Serial.println(6);
          }
          else if(i == 4){ //set both to 90
            Servo_2.write(90);
            Servo_1.write(90);
            Serial.println(7);
          }
          else{
            Serial.println("ERROR");
          }
        }
      }
      ptr = 0;
    }

  }
}